Nikon D90 Review
Nikon D90 Usability - How easy is it to use?
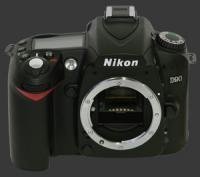
The ergonomics of the Nikon D90 are good with plenty of external controls within easy reach of the thumb or forefinger. It has a deep hand-grip with a protrusion for the front command-dial and another protrusion on the rear along the edge. This shape gives a very secure grip. Although not compact by any means, the D90 is not bulky either. The camera feels quite solid.
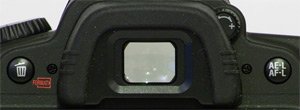
The D90 has a pentaprism viewfinder which provides a clear image and 96% coverage. Magnification is good at 0.94X. Just below the viewfinder image is the status display which shows all the important camera settings. This includes the usual shutter-speed, aperture, ISO and EC. Too bad metering mode is not there too since it can easily be changed without looking at the button. The viewfinder can also overlay auto focus points and grid lines to aid focusing and composition. In MF mode the selected point lights up but it is not an indication to confirm focus. Note that the biggest difference between the larger D300 and the D90 is that the former features a 100% coverage viewfinder.
While holding the D90, the forefinger can easily reach the exposure-compensation and metering buttons, just behind the shutter-release. Also on the top panel one finds the drive-mode and AF-mode buttons. Those are also meant to be reached with the forefinger but need a shift of grip to do so. Note that since only exposure-compensation is shown in the viewfinder, using other top-mounted buttons require taking the camera away from your eye.
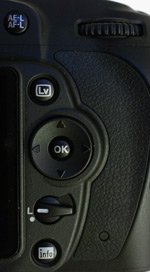 The AE-L/AF-L and LV buttons are located within reach of the thumb on the camera's rear. The AE-L button is customizable and so is the shutter-release. By having the shutter-release in AF-L (Auto-Focus Lock) mode and the AE-L/AF-L button in AE-L (Auto-Exposure Lock) mode, the camera can be used to meter, focus and frame separately for a given shot. This is one area where the bigger Nikon D300 has an additional focus button (AF-On) which allows to do meter and focus in any order for a given shot while remaining in automatic or semi-automatic mode.
Two-control wheels allow direct control for exposure parameters. Nikon calls one of them the command dial and the other the sub-command dial. Although there is a setting to reverse them, their functions are not always reversed sometimes for logical reasons though! For example, the rear-dial, which by default is the command dial, is always used for metering and exposure-compensation, even in reversed mode. The obvious reason for this is that the sub-command dial would be hard to use in combination with these due to their position. However, the command-dials become reversed when used to change aperture or shutter-speed when the reverse option is active. Another oddity is that A mode always uses the sub-command dial while S mode always uses the command dial. This does keep it consistent with M mode but it is strange that in A mode the aperture is not controlled by the main dial. In P mode the main dial is used for program shift. In P, A and S modes, the sub-command dial can be optionally used for exposure-compensation or for selecting the ISO sensitivity.
Both control-wheels are usable during image playback and menu navigation. In playback mode, the command dial changes images while the sub-command dial rotates the information displayed for the current image. Zooming is done by two buttons to the left of the LCD. Menu navigation with the dials is possible too. The main command dial is used to select between items within a menu-level and the sub-command dial changes levels and selects options. The normal way to navigate the menu system is by using the multi-way controller.
There is an Info button which can be used to display a status screen on the rear LCD. The status screen is very similar to the top LCD, with a bit more information. A second press of the Info button gives access to a six item menu to customize the camera in terms of Long-Shutter Noise-Reduction, High-ISO Noise-Reduction, Adaptive D-Lighting, Picture Control, Function button assignment and AE-L/AF-L button assignment. In Live-View mode, the Info button cycles through standard, info and grid display modes.
 On top of the camera, opposite to the shutter-release, is a rather busy mode-dial. The only required modes appear in black over silver. A green label marks the best-avoided Auto mode and silver icons mark the six scene modes which control both exposure parameter and color rendition.
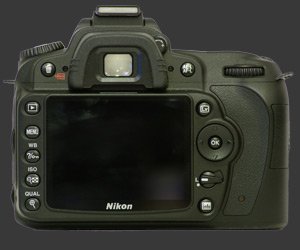
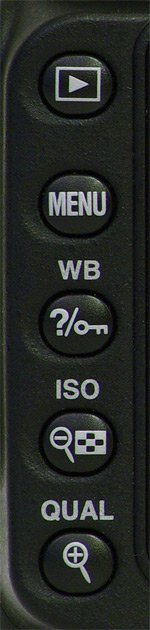
On the left-rear side of this digital camera, a vertical row of 6 buttons starts with Delete, followed by Playback, Menu, WB, ISO and Quality. The Delete button must be pressed twice to delete the displayed image. The Playback button enters the usual and rather typical playback mode. Like all DSLRs, the Nikon D90 is shooting-priority. The Menu button enters a two level menu system which is easy to read and navigate.
The WB button controls white-balance. The main command dial is used to select the white-balance setting and the sub-command dial is used to fine-tune along the amber-to-blue axis. Note that the D90 can fine-tune white-balance on the green-to-magenta axis too, but you have to enter the menu system to do that. Also, contrarily to ISO, AWB (Auto White-Balance) is selectable using the WB button in conjunction with the command dial.
The ISO button scrolls through fixed ISO values when used with the command dial and does nothing when used with the sub-command dial. Note that Auto ISO is not normally accessible through this dial. Instead, Auto ISO must be activated using the Shooting menu except in Auto mode where it is selectable using the main dial as expected. When activated, the ISO is increased from its preset value until a user-specified maximum or until the shutter-speed is faster than a user-selected limit, whichever comes first. The standard ISO sensitivity range of the Nikon D90 is 200 to 3200. A custom menu option allows this range to be expanded to ISO 100 to 6400 with the usual caveats of higher noise levels at ISO 6400. A minor point with respect to the expanded ISO range is that images taken outside of the normal range do not show the ISO value in the standard EXIF metadata. Perhaps only camera reviewers notice this.
The Quality button selects image quality in terms of format, compression and resolution in conjunction with the control wheels. This is the one button that makes us wonder why it is there at all, since changing image quality should not be a common operation.
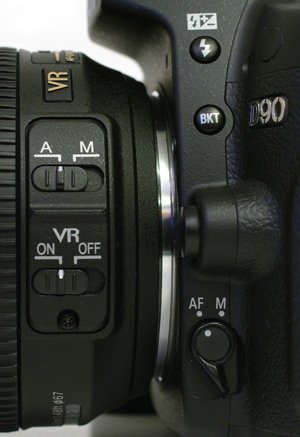
Wait, there are also controls on the front of the camera. On the hand-grip side, there is the DOF-Preview button and a second unmarked button known as the Fn button. This one can be set to one of 10 functions. On the other side of the lens mount, the flash button changes flash-mode and flash-compensation and the bracketing one changes the number of frames in a bracket and the increment. The AF/MF toggle and lens-release button do the obvious.
The rear LCD is incredibly sharp with a good viewing angle and controllable brightness for easy viewing under most conditions. Nikon also includes an LCD protector with the camera.
 |


|
Please Support Neocamera
All information on Neocamera is provided free of charge yet running this website is a huge endeavor. Purchases made via affiliate links found throughout the site help keep it running and up-to-date. There is no additional cost to you, so please consider buying via these links to our affilates:


Thank you for your support!


Nikon D90 Highlights
Sensor-Size: 24 x 16mm

Actual size when viewed at 100 DPI
| 12 Megapixels DSLR | ISO 100-6400 |
| Nikon F Mount 1.5X FLM | Shutter 1/4000-30s |
| 96% Coverage Large Viewfinder | Full manual controls, including Manual Focus |
| Built-in Dust Reduction | Custom white-balance with 2 axis fine-tuning |
| 4.5 FPS Drive, 100 Images | Spot-Metering |
| 1280x720 @ 24 FPS Video Recording | Hot-Shoe |
| 3" LCD 920K Pixels | Lithium-Ion Battery |
| Secure Digital High Capacity |
Camera Bag
Your camera bag is empty. To add a camera or lens click on the star next to its name.
Your camera bag is empty.
Add cameras or lenses by clicking on the star next to their name.
Updates
2026.05.21

Laowa 4.5-10mm F/2.8 Fisheye Zoom Lens Review
In-depth review of the Venus Optics Laowa 4.5-10mm F/2.8 Fisheye Zoom Lens. This lens zooms from a circular to rectangular fisheye with an 180° viewing angle. This review analyses its optical quality, construction and handling.
2026.04.13

Laowa 17mm F/4 Zero-D Shift Review
In-Depth review of the Venus Optics Laowa 17mm F/4 Zero-D Shift Lens. This ultra-wide Shift lens is specifically designed for Mirrorless Digital Cameras and is available in 4 Full-Frame mounts plus 2 Medium-Format ones.
2025.11.13

Best Gifts for Photographers in 2025 by Budget
The annual Neocamera Photography Gift Guide updated to 2025. Find great gifts for photographers with any price budget.
2025.07.07

Stellar Photo Recovery Review
Review of Stellar Photo Recovery V12. This Windows and MacOS software can recover photos and videos in a huge number of formats from memory cards, USB drives, SSDs and HHDs.
2025.05.14

Huion Kamvas 13 Gen 3 Review
In-Depth review of the Huion Kamvas 13 Gen 3 Pen Display Tablet for photographers and graphic artists.
2025.01.18

Fujifilm GFX 2025 Lens Roundup
Lens Review roundup of Fujifilm GFX Medium-Format lenses. Quality, performance and handling of the GF20-35mm F/4R WR, GF30mm F/3.5 Tilt-Shift and the GF55mm F/1.7.
2024.11.18

Best 2024 Photography Gifts for Every Budget
Great gifts for photographers and photo enthusiasts selected for every budget among the best products of 2024.
2024.08.07

Eye Protection Tips for Professional Photographers
The four main considerations for professional photographers regarding eyewear.
2024.07.14

Fujifilm X100VI Review
Flagship fixed-lens compact digital camera with a 40 MP sensor and Image-Stabilization, a first for the series. Retro design featuring dual control-dials, plus direct ISO, Shutter-Speed and EC dials. Its hybrid viewfinder can switch between EVF and OVF mode.
2024.05.09

Fujifilm GFX100 II Review
Flagship 102 Megapixels Medium-Format Mirrorless Digital Camera with 8-Stop 5-Axis IBIS, 8 FPS Drive, 8K Video and 400 MP Super-Resolution capture in a weatherproof and freezeproof body with dual control-dials and dual memory-card slots.
2024.04.03

Fujifilm X-T5 Review
Newest Fujifilm flagship boasting a 40 MP APS-C sensor, 5-axis IBIS with 7-stop efficiency, 15 FPS continuous drive, 6.2K Video capture, dual control-dials and dual SDXC UHS-II slots in a sturdy weatherproof and freezeproof body.
2023.11.20

Best Digital Cameras of 2023
Find out which are the Best Digital Cameras of 2023. All the new Mirrorless Digital Cameras from entry-level to high-end professional.
2026.05.21
2026.04.13
2025.11.13
2025.07.07
2025.05.14
2025.01.18
2024.11.18
2024.08.07
2024.07.14
2024.05.09
2024.04.03
2023.11.20