Fujifilm Finepix REAL 3D W3 Review
Fujifilm Finepix REAL 3D W3 Introduction
The Fuji Finepix REAL 3D W3 is an almost uniqueIts predecessor the W1 had a limited release and worked the same way. digital camera that can capture 3D images and 3D HDTV video. 3D images and 3D videos from the W3 are directly visible on the camera's large 3.5" lenticular LCD without the use of any special glasses. They can also be viewed on a modern 3D HDTV via HDMI connection or on the Fuji REAL 3D V1 Viewer
digital photo frame.
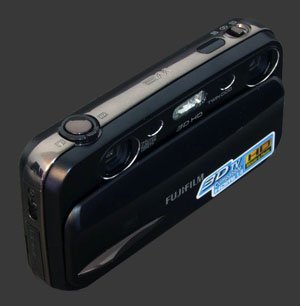
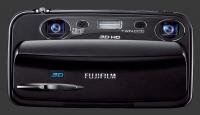
The design of the W3 includes almost two complete cameras in a single relatively compact body. It has two 10 megapixels CCDs and two folded-optics 3X optical zoom lenses set 75mm (3") apart. This is similar to the average distance between human eyes and each lens is used to capture the view of one eye. The camera can produce a standard 2D image using a single CCD or a 3D image by combining one image from each sensor. It works exactly the same way for 2D and 3D video.
The specifications of this 3D digital camera may seem straight-forwards but the combination of the two image paths does not produce the same result as a single one with an extra dimension. This is why the specifications below are divided into Joint, 2D and 3D specifications.
Joint 2D & 3D Specifications
- ISO: 100-1600, Auto or Manual
- Shutter-Speed: 1/000s - 1/2s
- Aperture: F/3.7 at wide-angle, F/4.2 at telephoto
- Two neutral density filters simulate smaller apertures
- Normal focus distance, 60cm to infinity
- AF-S and AF-C focusing
- Metering: 256-segment, Spot, Average
- Exposure-Compensation: -2..+2 EV, 1/3 increments
- Automatic white-balance and 7 presetsSunlight, Shade, 3 Fluorescent, Incandescent & Underwater..
- Program, Aperture-Priority & Manual exposure
- 14 Scene modesAnti-Blur, Natural+Flash, Natural Light, Portrait, Landscape, Sports, Night, Night Tripod, Sunset, Snow, Beach, Underwater, Party., applicable to 2D & 3D
- Self-timers: 2 and 10 seconds
- Flash: Auto, Fill, Redeye, Off, Slow-Sync, Slow-Sync+Redeye
- 3.5" LCD, 1.15 Megapixels, 100% coverage
- 1280x720 @ 24 FPS HD video with stereo sound
- Mini-HDMI output
- SDHC Memory
- Lithium-Ion Battery
2D Specifications
- 10 Megapixels sensor
- 3X Optical zoom, equivalent to 35-105mm
- Macro focusing down to 8cm
- Multiple focus-points
- 3 Advanced 2D modesDual ISO, Dual color, Dual framing.
- Face-Detection, 2D only
- 2D Continuous drive, 1 FPS
- 2D High-speed continuous drive, 3 FPS, 3 megapixels
- JPEG Images, 5 MB at highest-quality
- AVI Video, 5min per GB
3D Specifications
- Twin 10 Megapixels sensors
- 3X Optical zoom, roughly equivalent to 39-149mm
- Recommended minimum shooting distance: 3.1m at wide-angle, 4.1m at telephoto
- Macro focusing down to 38cm
- Center focus-point only
- 2 Advanced 3D modesIndividual Shutter, Interval 3D Shutter.
- 3D Continuous drive, 2 FPS, 3 megapixels
- Parallax adjustment in record and playback modes
- MPO Images, 10 MB at highest-quality
- MPO+JPEG mode, 15 MB at highest-quality
- AVI Video, 2½min per GB
Fujifilm Finepix REAL 3D W3 Capability - What can it do?
 The selling-point of the Fuji Finepix READ 3D W3 is undoubtedly its 3D capabilities for both video and images. These are thoroughly discussed in this review section further down, but let's get the standard 2D capabilities out of the way.
The 2D specifications of this camera are quite basic with one unusual occurrence: It has a manual exposure mode but no custom white-balance option. The 10 megapixels sensor and 3X optical zoom lens are minimal these days and the lack of wide-angle certainly can feel restrictive indoors. It features exposure-compensation of -2 to +2 EV, in 1/3 increments. The exposure latitude is rather narrow with a fastest shutter-speed of 1/1000s and a slowest one of 1/2s. This is barely enough to freeze most non-motorized sports and not enough for typical night photography. There is no physical aperture on the W3, instead the fixed aperture is complemented by two neutral-density filters to reduce light coming in. Unlike a physical aperture, this means that depth-of-field does not change with the chosen aperture value.
The 3D specifications of this camera are naturally bound by its 2D specifications but the way two flat images are combined to produce an image with a sense of depth affects the 3D result. Technically, images produced by the REAL 3D W3 are called stereoscopic images. A stereoscopic image is a product of two normal images with slightly different viewpoints. When seen through two eyes, such an image gives the impression of depth from a single viewpoint. Unlike a hologram or 3D environment, as is common in modern video games, a stereoscopic image only shows one particular viewpoint and loses the impression of depth when not viewed from a certain viewpoint. That is because each eye is seeing a single 2D image.
The separation of viewpoint between two images forming a 3D one is called parallax. This is what gives viewers the impression of depth. Since the Fuji Finepix REAL 3D W3 uses a pair of standard focusing lenses, it normally automatically adjusts parallax so that subjects at the focus-distance converge perfectly. These therefore appear in sharp focus and inline with the 3D display. Closer objects appear to come out of the display and those further appear to be further. Depending on how the scene is composed, users may want to adjust parallax and Fuji provides a rocker switch to control it. With that control, almost any point in the image can be made to converge in terms of parallax. This does not affect focus in any way, so it is possible to converge on an out-of-focus area which results in a difficult image to visualize. The same can happen if parallax is adjusted so that nothing converges.
 Stereoscopic displays count on our brains processing images seen by each eye and give us the impression of depth. The brain works in complex ways, taking all sorts of queues from the scene, including converging lines, shadows and differences in lighting. As such, not all 3D images result in the same impression of depth. In some cases, particularly if parallax is manually adjusted, it is possible that our brain cannot reconstruct the image properly which results in a strange-looking images which is uncomfortable to look at. Also because the W3 is basically tricking us into seeing depth, it causes stress to our vision and therefore Fuji recommends not to use it for more than 30 minutes at a time. More importantly, young kids may not have fully formed their 3D perception and so it is not recommended for children under 6 years old. We certainly cannot give any medical advise here, so please consult with a pediatrician if you have concerns about this.
The 3D/2D toggle button serves in capture mode to switch between 2D and 3D capture. It works in all modes except the advanced ones which are dedicated to their respective dimension. In playback mode, the same toggle button can change the display to show a 3D image in 2D. While viewing in 3D, the parallax of images can be adjusted because the W3 keeps enough data to reconstitute any parallax for a captured images. After adjusting parallax, the camera prompts to save the adjusted image or not. A new image is saved and the original image remains unchanged.
The way eyes adjust for parallax to move more or less towards each other. When something is sufficiently far, both eyes look straight ahead. While a 3D camera could conceivably work like that too by rotating its twin-lenses towards each other, this digital camera simulates this differently. The way it is done has noticeable implications on its 3D output. Instead of rotating the lenses, the W3 masks pixels from the outer sides of each sensor such that the resulting image represents the desired parallax. This causes the horizontal field-of-view of images to change as parallax is adjusted. Since the vertical field-of-view is not affected, the resulting images have different aspect-ratios depending on parallax. We have no idea how Fuji decides to print these things, but something has to be cropped or letter-boxed.
The advanced 3D mode offers the option to compose images by taken the left and right images at different times. The Individual Shutter 3D mode is the simplest to use and only requires two images to be taken, one at the time, as it would with a regular camera. To help align the images, the camera overlays the first one on the display while framing the second one. An menu option controls which one is the left and which one is the right. It is extremely easy to capture something which makes no sense and will not combine into a 3D image. However, this mode is useful when taking pictures of distant objects which would look very flat because they do not appear so different from 75mm apart. Instead, those should be taken from further apart but great care must be given to avoid shifting the camera vertically, tilting it or including moving objects. The second advanced 3D mode is called Interval Shutter 3D and does the same thing but with a set interval, so the shutter needs to be pressed only once.
 The MPO files stored by the Fuji actually contain all pixels from the twin CCDs, so not only is it possible to adjust parallax after taking the picture, it is possible to have image elements which were outside the apparent field-of-view reappear in images. This mean that more pixels than required is stored with each image as well. Also, the MPO format does not appear to do any inter-image compression and therefore produces 3D files that are twice as heavy as 2D files. We imagine a lot of space could be saved here since images taken a few centimeters apart are bound to have a lot in common.
This camera can also record HD video in 2D or 3D. The resolution can be set as high as 720p at 24 FPS. Along with the twin CCDs, the W3 has two microphones to capture stereo sound. 3D videos are actually quite impressive since the sense of depth is even more perceptible with motion. Parallax is fixed at the beginning of filming, otherwise the aspect ratio of the video would have to continuously change which would look rather disturbing me imagine. Neither zoom nor focus can be adjusted while recording.
The REAL 3D W3 has 3 tricks up its sleeve for 2D capture. These are grouped under the Advanced 2D mode and simply involve taking two 2D pictures simultaneously. They can be taken with differing ISO sensitivities, differing color modes or even differing framing. For ISO, one lens basically shoots in Auto ISO 400 mode and the other in Auto ISO 1600 mode. As such, in low light you will get one ISO 400 and one ISO 1600 images but in bright light, both images may be taken at the same setting. For the framing option, the right lens is zoomed in all the way to get a tighter crop.
Fujifilm Finepix REAL 3D W3 Usability - How easy is it to use?
The REAL 3D W3 falls into the compact digital camera category while being shaped similarly to an oversized ultra-compact. It is wider than most compact cameras to accommodate the dual lenses and required distance between them. The sturdy sliding lens cover serves as power switch, so turning this one on accidentally is nearly impossible. There is a small protruding element on the front of the lens cover but is not ideally placed and too smooth to give a secure grip on the camera, so a two-handed hold is preferable.
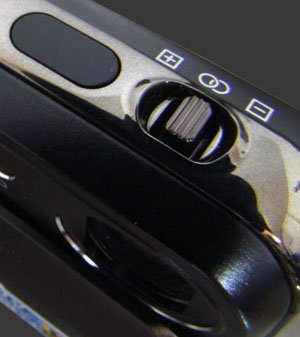 Holding the W3 poses some challenges, the left lens is flush with the side of the camera, so care must be taken no to obstruct that lens with your fingers. Even with the index finger on the parallax control, the middle finger has to be kept on the side of the camera. The right lens gives a little more space but is extremely easy to obstruct and keeping it clear never feels comfortable. This is obviously problematic and not as easy to notice as it seems since the 3D display affects perception. Fuji implemented some form of warning but it almost never gets triggered because it requires the center of the lens to be obstructed, it is much easier to block it just a little!
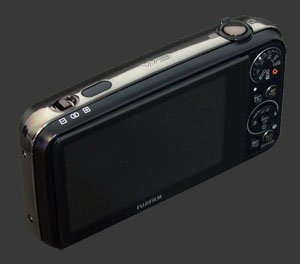
With the proper holding technique, using the W3 is quite straight-forwards, particularly for owners of other Fuji cameras. The top of the camera holds a standard two-stage shutter-release with a zoom-controller wrapped around it and a rocker at the opposite end to control parallax. The shutter-release has a soft halfway point with short travel, so care most be taken no to release it before the camera confirms focus. The zoom controller is completely standard. The parallax controller only works in 3D mode and shows the left and right images overlapping on screen while being adjusted. As parallax is adjusted, the image aspect ratio follows, going from a wide 4:3 aspect to a narrow vertical image.
Parallax can be set automatically by the camera based on the focus-point or manually by the photographer. The best results are given by the automatic mode since it forces consistency between parallax and focus. The catch is that the aspect-ratio changes almost each time the camera focuses, so framing is difficult. In practice, you can end up focusing twice: Once to get the parallax set and set the aspect ratio, and once more after adjusting the zoom and framing. After some practice, if the zoom does not need to be adjusted, the usual focus-and-reframe technique can be used. With manual parallax, there is no aspect ratio or framing change while engaging focus but you most take the time to select a reasonable parallax. Keep in mind that parallax can be overridden in automatic mode as well, so we expect most people to use it.
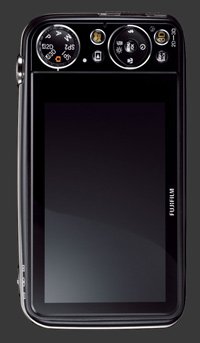
The back of the camera is dominated by a huge widescreen display. It has 3.5" diagonally and 1.15 megapixels, making it extremely detailed. This is a lenticular screen which shows 3D images directly without any special glasses. This design means that it must be looked straight-on in landscape orientation to see the 3D effect. Otherwise, it looks like a 2D display except that you see either the left or right image depending on your viewing angle. Sweeping the screen shows a variation in luminance, so it is important to view it properly and it is therefore not ideal for sharing pictures directly on the screen. The LCD itself is bright and refreshes quickly. Clicking the Up direction on the 4-way controller brightens the display momentarily. No one should be surprised to read that this camera does not have an optical viewfinder.
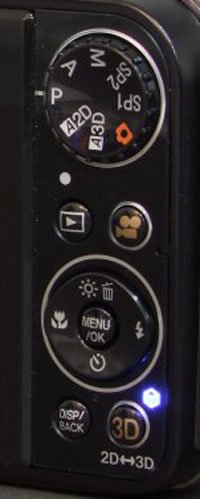 The rest of the camera's back is covered in controls. The thumb naturally rests on the mode-dial which is slightly curved inwards in its center. The mode-dial has 8 positions: Auto, Advanced 3D, Advanced 2D, Program, Aperture-Priority, Manual, Scene-Program 1 and Scene-Program 2. Auto and Program are fully automatic modes. The difference is that Auto does not allow changes to EC, WB, Metering. It does allow to select one of the 3 automatic ISO options but not a specific ISO. In A or M mode, exposure parameters are changed using the menu system, which is rather inefficient. The same menu is also used to change EC, which is certainly the most questionable aspect of the W3's interface. Yes, they ran out of button space but between LCD brightness boost and EC, we would choose EC. The two advanced modes were already explained and the 2 scene-program positions are the same except they each remember the last scene-mode separately.
Directly below the mode dial are the Playback and Video mode buttons. Playback works just as expected and the Video button enters a dedicated video mode. Pressing it the Video button again, returns to still mode. Further down is the 4-way controller with a central Menu/OK button. This controller is used to activate and navigate the menu reasonably organized system. Outside of menu navigation, all 4 directions of the 4-way controller activate a different functions. We already mentioned the LCD Brightness Boost function of the Up direction. The Right button iterates through flash-modes. The Down button cycles between the self-timers. After each use, the self-timers reset themselves which is good for not forgetting and annoying for tripod work. The Left button toggles macro-mode on and off.
All the way down are two more buttons, the Disp/Back button and the 2D/3D toggle. Disp cycles through different viewing overlays. In 3D mode, turning off the overlay can help perceive the 3D effect. The 2D/3D toggle chooses between 2D and 3D mode when applicable. Only the dedicated Advanced modes ignore that button.
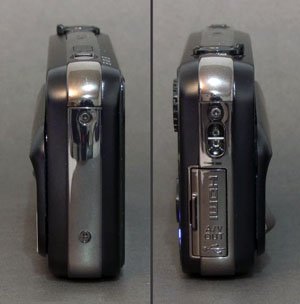
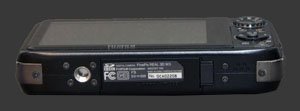
A result of the W3's unusual design is that the battery and memory card compartment is located in the center of the camera. This in itself is not a problem and the slide-and-flip mechanism is fairly standard and easy to use. The only inconvenience is that the tripod mount is not aligned with anything useful. Keep in mind that it is probably not possible to stitch stereoscopic images, so the ideal would be to line-up with the left lens which is the one being used in 2D mode. The only remaining criticism of the W3 applies to most Fuji digital cameras and is that the camera completely shuts down after a period of inactivity, rather than entering a light sleep mode. The only way to wake it up is to turn the camera off and back on using the sliding lens cover. Since this is a full power-cycle it takes long to get back to shooting.
 |
Please Support Neocamera
All information on Neocamera is provided free of charge yet running this website is a huge endeavor. Purchases made via affiliate links found throughout the site help keep it running and up-to-date. There is no additional cost to you, so please consider buying via these links to our affilates:
Thank you for your support!
Fujifilm REAL 3D W3 Highlights

Sensor-Size: 6 x 5mm

Actual size when viewed at 100 DPI
| 10 Megapixels 3D Fixed Lens | ISO 100-1600 |
| 3X Optical Zoom | Shutter 1/1500-3s |
| 1 FPS Drive, 40 Images | Full manual controls |
| 1280x720 @ 24 FPS Video Recording | Spot-Metering |
| 3.5" LCD 1.2 Megapixels | Lithium-Ion Battery |
| Secure Digital High Capacity, Internal Memory |
Updates
2025.11.13

Best Gifts for Photographers in 2025 by Budget
The annual Neocamera Photography Gift Guide updated to 2025. Find great gifts for photographers with any price budget.
2025.07.07

Stellar Photo Recovery Review
Review of Stellar Photo Recovery V12. This Windows and MacOS software can recover photos and videos in a huge number of formats from memory cards, USB drives, SSDs and HHDs.
2025.05.14

Huion Kamvas 13 Gen 3 Review
In-Depth review of the Huion Kamvas 13 Gen 3 Pen Display Tablet for photographers and graphic artists.
2025.01.18

Fujifilm GFX 2025 Lens Roundup
Lens Review roundup of Fujifilm GFX Medium-Format lenses. Quality, performance and handling of the GF20-35mm F/4R WR, GF30mm F/3.5 Tilt-Shift and the GF55mm F/1.7.
2024.11.18

Best 2024 Photography Gifts for Every Budget
Great gifts for photographers and photo enthusiasts selected for every budget among the best products of 2024.
2024.08.07

Eye Protection Tips for Professional Photographers
The four main considerations for professional photographers regarding eyewear.
2024.07.14

Fujifilm X100VI Review
Flagship fixed-lens compact digital camera with a 40 MP sensor and Image-Stabilization, a first for the series. Retro design featuring dual control-dials, plus direct ISO, Shutter-Speed and EC dials. Its hybrid viewfinder can switch between EVF and OVF mode.
2024.05.09

Fujifilm GFX100 II Review
Flagship 102 Megapixels Medium-Format Mirrorless Digital Camera with 8-Stop 5-Axis IBIS, 8 FPS Drive, 8K Video and 400 MP Super-Resolution capture in a weatherproof and freezeproof body with dual control-dials and dual memory-card slots.
2024.04.03

Fujifilm X-T5 Review
Newest Fujifilm flagship boasting a 40 MP APS-C sensor, 5-axis IBIS with 7-stop efficiency, 15 FPS continuous drive, 6.2K Video capture, dual control-dials and dual SDXC UHS-II slots in a sturdy weatherproof and freezeproof body.
2023.11.20

Best Digital Cameras of 2023
Find out which are the Best Digital Cameras of 2023. All the new Mirrorless Digital Cameras from entry-level to high-end professional.
2023.07.10

Fujifilm X-H2 Review
40 Megapixels APS-C Hybrid Mirrorless Digital Camera with 7-stop IBIS. Fastest shutter ever and 8K video capture. Large builtin EVF with 0.8X magnification and 5.8 MP, plus an Eye-Start Sensor. Packed with features and large number of controls in a weatherproof and freezeproof body.
2023.05.07

Sony FE 20-70mm F/4G Review
Review of the unique Sony FE 20-70mm F/4G lens. The optical zoom of this lens spans ultra-wide-angle and medium focal-length coverage, making it one of the most versatile Full-Frame lenses on the market.


