Understanding Exposure Compensation
Introduction
Exposure-Compensation is a feature of digital cameras, usually marked by a plus & minus sign, to adjust the brightness an image before it is taken. It is often refered by its acronym, ECExposure-Compensation. Using EC is straight forwards on most cameras: Press the EC button and either turn a control-dial, if your camera has one, or use the directional buttons to change settings.
 LEFT: A DSLR hand-grip shows an EC button towards the front, behind the shutter-release. EC is changed by holding it down while rotating the rear control-dial, seen near the bottom of the image.
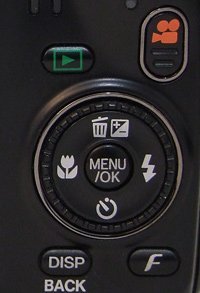
RIGHT: A compact digital camera has the Up directional-button set for EC. Once pressed, either use Up/Down to change EC or turn the ring around the 4-way controller.
This basic feature simply lets a user tell the camera that the image should be captured brighter or darker. To make things brighter, we apply positive exposure-compensation, obviously indicated by positive numbers. To make things darker, we apply negative exposure-compensation, indicated by negative numbers. Most cameras respond by making the display brighter or darker. This may not be entirely accurate depending on your camera or when the flash is enabled.
On a point-and-shoot camera, exposure-compensation is usually the only control over image brightness. Even cameras with manual-controls incuding DSLRs and SLDs have EC. It works the same way with those cameras and is still one of the most used settings.
Exposure-Compensation in Auto & Semi-Auto Modes
Exposure-Compensation adjusts exposure in steps called EVs. All cameras have an exposure-compensation range denoted as -3..+3, for example. In such case, the camera can adjust exposure from 3 stops darker to 3 stops brighter. A difference of one stop or EV represents double the brightness. So, -1 EV is twice as dark while +1 EV is twice as bright compared to a normal exposure. So, -2 EV is 4 times darker than a normal exposure.
The following series of images illustrates the difference. The leftmost image is taken with EC set to -2 EV and the next one with -1 EV. The central image is a normal exposure. To its right is an image taken with +1 EV and the rightmost one is taken with +2 EV.

While the full-stops are great to visualize the difference between, all current digital cameras allow smaller steps too, either in 1/3 or 1/2 steps. All but the most basic DSLRs let the user choose which steps to use. When set to 1/3 steps, you can set EC to ±1/3, ±2/3, ±1, ±1 1/3 etc up to the limit of your camera. In ½ steps, instead you get ±½, ±1, ±1½, ±2, etc.
Nearly all camera modes compute exposure using a metering system. The exceptions are Manual and Bulb mode which are explained in the pink box in the right column. Every other mode uses metering: Program (P), Aperture-Priority (A), Shutter-Priority (T), Auto, Easy, Green, Scene modes, Panorama mode, etc.
Exposure-compensation works by adjusting the metered exposure using the set value. When the camera meters, it takes a guess as to what will produce a good exposure. By using EC, you tell the camera to adjust its guess. Most times, this is done to correct a wrong guess from the camera. With uncommon scenes like huge expanses of sand and snow, a camera tends to guess wrong. Using EC is the easiest way to correct this.
Several parameters control exposure. The essential ones are Aperture, Shutter-Speed and ISO Sensitivity. These ones always exist but they are not always under user-control. Some digital cameras have additional parameters which influence proper exposure. All modern cameras have a fully automatic modePossibly called Auto, Program or Easy which controls exposure-parameters based on the camera's metering mode. Cameras commonly have several other modes, each of which controls a subset of exposure parameters.
Metering usually occurs when the shutter-release is pressed halfway or the AE-L button is pressed, whichever comes first. Let's go through an example of a simple point-and-shoot camera in its most automatic mode:
- The camera is aimed at a subject and you use the zoom to frame it in a pleasing way.
- You press the shutter-release halfway and the camera computes and exposure.
- You fully press the shutter and take the photo.
- It appears on the rear LCD. Ideally you would check the histogram but understand it requires another article, so make sure the LCD brightness is reasonable for now.
If the image appears to your liking, then no need to apply exposure-compensation. Otherwise, if the image is too dark then you need to apply positive exposure-compensation. How much to apply depends on how much brighter you want the image. Remember that each full stop makes the entire image double in brightness.
Modern cameras rarely get it very wrong for typical scenes. In general, blow highlights can be saved by -½ or -1 EV. An overly dark beach or snow scene may need +1 to +2 EV. For artistic reasons, you may want to go further. To get perfectly black silhouettes, -3 to -4 EV is common.
 After applying EC, take the shot again. If it is still not to your liking, then you have to try another amount of compensation. Obviously not all shots can be retaken, so it is important to try to have the right amount set before taking a shot.
Here is what separates the pros from the rest. An SLR, digital or analog, does not simulate exposure through its viewfinder, it just can't. Instead, by using the camera heavily in various circumstances, pros learn how their camera reacts and become good at predicting it. When in doubt, one can take a test shot, switch exposure modes or even use a light-meter. There are plenty of ways around it but they all take time, so learning a camera's behavior is ideal.
Users of fixed-lens cameras or SLDs have it easier. Be it on the rear LCD or an EVF, these cameras usually simulate exposure to produce the preview. This is known as being Exposure-Priority. It is not always fully implemented but for ±2 stops of EC in Program or Auto mode, it usually reasonably close. Some DSLRs equipped with Live-View are Exposure-Priority too. At the time of writing, Canon and Sony have the best implementations.

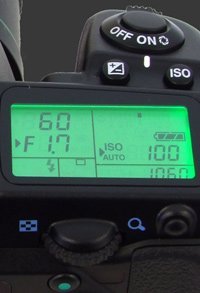
Now, back to the example. Suppose the computed exposure is: ISO 200, F/8 and 1/500s.
Everything is automatic, so the camera chooses the parameter as it pleases. Suppose the image was too dark and you take the shot again after applying +1 of EC. The camera computes its exposure and adjusts it to be 2X brighter. One way it can do that is set the shutter-speed to 1/250s. It can also do that with an aperture of F/5.6 or an ISO of 400.
 Now, if you were to take the same photo again in Aperture-Priority mode with the aperture set to F/8 and the ISO set to 100, the camera would have originally chosen a shutter-speed of 1/250s. By applying +1 EC in this case, it would have to choose a shutter-speed of 1/125s. In this case, the camera can only adjust with shutter-speed since both remaining parameters are fixed.
Remember that any combination of parameters which gives the same exposure does not give the same picture! The resulting pictures has roughly the same brightness level, but looks different. Shutter speed changes affect the appearance of objects in motion. Aperture changes affect depth-of-fieldThe distance range at which objects are acceptably sharp. ISO sensitivity changes affect image noise.
There is another possible variable and that is Flash Output. If flash is used, built or not, the camera can usually control how much light to emit. Depending on the flash though, there may be limited latitude though. It is also possible to control flash power manually with some cameras. An Auto flash-mode will select between ON and OFF but will greatly affect the resulting photograph. Forced OFF mode is easy to understand, it removes flash out of the equation. Forced ON mode always uses the flash but can vary its output intensity.
Flash modes affect whether a camera considers the flash part of the exposure or not. Fill and Slow-Sync modes usually do not consider flash primary illumination. On some cameras, when the flash is used as the main light source, exposure compensation will only affect flash output. Therefore only objects within the flash range will appear brighter or darker.
Exposure-Compensation is an easy way to control the brightness of images and still benefit from metering. It takes some experimentation to consistently predict the perfect amount of EC needed for each situation but the process is gradual. This is one of the few controls available on all point-and-shoot digital cameras. Even DSLR users should prefer using EC than going fully manual most of the time.
Please Support Neocamera
All information on Neocamera is provided free of charge yet running this website is a huge endeavor. Purchases made via affiliate links found throughout the site help keep it running and up-to-date. There is no additional cost to you, so please consider buying via these links to our affilates:


Thank you for your support!


Exposure-Compensation in Manual Mode
There is no Exposure-Compensation in Manual mode.
The previous statement is a very slight over-simplification of reality but it does convey what is needed. Most cameras will disable EC entirely in Manual and Bulb mode. The reason is simple, with the user in control of every exposure parameter, there is nothing left for the camera to compensate exposure with. All parameters are fixed and therefore exposure is fixed.
For cameras with a single control-dial, such as all entry-level DSLRs and most SLDs, controlling both shutter-speed and aperture requires a button to switch between the two. Logically, the button to use is the EC button, which is why Canon DSLRs have their EC button also labeled Av.
Cameras with dual control-dials do not have the same need yet may still disable the EC button. If it is not disabled though, changing EC affects metering but not exposure. Remember, it cannot affect exposure because parameters are fixed.
Metering in Manual mode has no effect on exposure either. Yet, as a courtesy to the user, almost all DSLRs still meter when using modern lenses. This is done to display the exposure meter telling how far the set exposure is from the metered exposure. In Manual mode, EC simply changes what the exposure-meter shows.
Bulb mode makes the shutter-speed unknown to the camera since it is controlled manually. As such, the camera cannot even meter in Bulb mode and therefore cannot even offset the metered value by the set EC.
Updates
2026.05.21

Laowa 4.5-10mm F/2.8 Fisheye Zoom Lens Review
In-depth review of the Venus Optics Laowa 4.5-10mm F/2.8 Fisheye Zoom Lens. This lens zooms from a circular to rectangular fisheye with an 180° viewing angle. This review analyses its optical quality, construction and handling.
2026.04.13

Laowa 17mm F/4 Zero-D Shift Review
In-Depth review of the Venus Optics Laowa 17mm F/4 Zero-D Shift Lens. This ultra-wide Shift lens is specifically designed for Mirrorless Digital Cameras and is available in 4 Full-Frame mounts plus 2 Medium-Format ones.
2025.11.13

Best Gifts for Photographers in 2025 by Budget
The annual Neocamera Photography Gift Guide updated to 2025. Find great gifts for photographers with any price budget.
2025.07.07

Stellar Photo Recovery Review
Review of Stellar Photo Recovery V12. This Windows and MacOS software can recover photos and videos in a huge number of formats from memory cards, USB drives, SSDs and HHDs.
2025.05.14

Huion Kamvas 13 Gen 3 Review
In-Depth review of the Huion Kamvas 13 Gen 3 Pen Display Tablet for photographers and graphic artists.
2025.01.18

Fujifilm GFX 2025 Lens Roundup
Lens Review roundup of Fujifilm GFX Medium-Format lenses. Quality, performance and handling of the GF20-35mm F/4R WR, GF30mm F/3.5 Tilt-Shift and the GF55mm F/1.7.
2024.11.18

Best 2024 Photography Gifts for Every Budget
Great gifts for photographers and photo enthusiasts selected for every budget among the best products of 2024.
2024.08.07

Eye Protection Tips for Professional Photographers
The four main considerations for professional photographers regarding eyewear.
2024.07.14

Fujifilm X100VI Review
Flagship fixed-lens compact digital camera with a 40 MP sensor and Image-Stabilization, a first for the series. Retro design featuring dual control-dials, plus direct ISO, Shutter-Speed and EC dials. Its hybrid viewfinder can switch between EVF and OVF mode.
2024.05.09

Fujifilm GFX100 II Review
Flagship 102 Megapixels Medium-Format Mirrorless Digital Camera with 8-Stop 5-Axis IBIS, 8 FPS Drive, 8K Video and 400 MP Super-Resolution capture in a weatherproof and freezeproof body with dual control-dials and dual memory-card slots.
2024.04.03

Fujifilm X-T5 Review
Newest Fujifilm flagship boasting a 40 MP APS-C sensor, 5-axis IBIS with 7-stop efficiency, 15 FPS continuous drive, 6.2K Video capture, dual control-dials and dual SDXC UHS-II slots in a sturdy weatherproof and freezeproof body.
2023.11.20

Best Digital Cameras of 2023
Find out which are the Best Digital Cameras of 2023. All the new Mirrorless Digital Cameras from entry-level to high-end professional.
2026.05.21
2026.04.13
2025.11.13
2025.07.07
2025.05.14
2025.01.18
2024.11.18
2024.08.07
2024.07.14
2024.05.09
2024.04.03
2023.11.20
Camera Bag
Your camera bag is empty. To add a camera or lens click on the star next to its name.
Your camera bag is empty.
Add cameras or lenses by clicking on the star next to their name.
NEWS
2026.05.13

Sony Levels Up 6th Generation Alpha A7R
Digital Camera
2026.05.13
Canon Launches First Full-Frame Video Mirrorless
Digital Camera
2026.05.12
Panasonic Finally Launches LX100 II Successor
Digital Camera
2026.03.24
Panasonic Launches ZS300 Compact Ultra-Zoom
Digital Camera
2026.03.10

Venus Optics Unveils Ultra Wide Perspective Control Lens Duo
Lens
2026.02.24
Nikon Release Lighter Bright Constant-Aperture Full-Frame Telephoto Zoom Lens
Lens
2026.02.05
Canon Introduces 2 Extreme Wide Full-Frame Lenses
Lens
2026.01.06
Nikon Introduces Lightweight Full-Frame Zoom Lens
Lens
2025.12.02
Sony Upgrades Alpha 7 to 5th Generation
Digital Camera ○ Lens
2025.11.29
Venus Optics Releases New Zero-D Tilt-Shift Macro Lens
Lens
2025.11.23
Best Digital Cameras of 2025
Digital Camera
2025.11.14

Photography Gift Guide 2025 Edition